A pricing procedure is a method for determining a product's or service's final cost. You would order these conditions in a certain order and provide the criteria for calculating a total, for instance, if the price of a product is decided as (base price - rebates + freight + tax). A condition type is the name given to each of these pricing components in a pricing procedure. The conditions may apply to the entire document at the header level or a specific item level. The values for each condition type can either be manually entered or found out using a condition technique. To clarify, you can give each condition type an access sequence when using this method. The system checks pricing records kept in condition tables in a certain order after the sequence. Following that, the condition record is taken from the tables and applied to the pricing schema. You may see a summary of a pricing procedure and its elements in Figure 1.
To configure price, perform the following key actions:
Step 1: Define the condition tables You must first provide the condition tables with various key field combinations. The pricing condition records for these key combinations are then set up.
Step 2: Define the access sequences During the pricing determination run, SAP searches for the valid condition record using access sequences as the search criteria.
You organize the condition tables specified in step 1 in the sequence you want SAP to access the condition records in this step, where you describe this access sequence. The general approach is to arrange the tables from most specific to more generic, as with any condition technique.
Step 3: Set up the condition types In this section, you establish condition types and link them to the access sequence you created in step 2. Each condition type corresponds to a schema element. Prices, discounts, freight restrictions, tax, and fees are configured as separate condition types.
Step 4: Define the pricing procedure The method used to determine the final price is called the pricing procedure. The relationship between the several condition types that were each specified in step 3 is maintained by linking them together. Additionally, you can include complicated formulae that could be needed to calculate any amount.
Step 5: Assign the pricing procedure The price strategy for each sales transaction is then decided. Which method is to be used to a 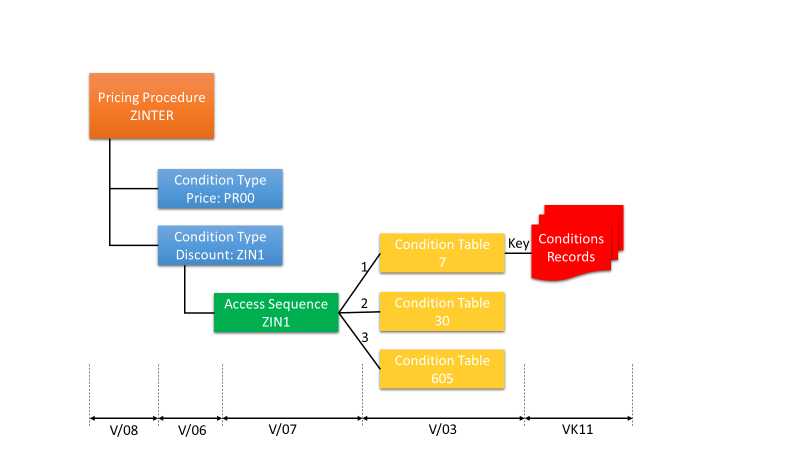
particular customer and sales document type is at your control. These guidelines for establishing the pricing procedure are specified in this stage.
Figure 1 Elements of a pricing procedure
Configure Pricing
We'll design a pricing procedure using the step-by-step process described earlier, and we'll go into more detail about each step in the parts that follow.
Step 1: Define the Condition Tables
The creation of condition tables is the initial stage. You must use a field catalog in order to build up a condition table. You can choose the fields you need for your condition table from this list.
Conditions: Allowed Fields
Follow the menu path:
IMG ➢ Sales And Distribution ➢ Basic Functions ➢ Pricing ➢ Pricing Control ➢ Condition Tables and Field Catalog ➢ Change Field Catalog (OV24).
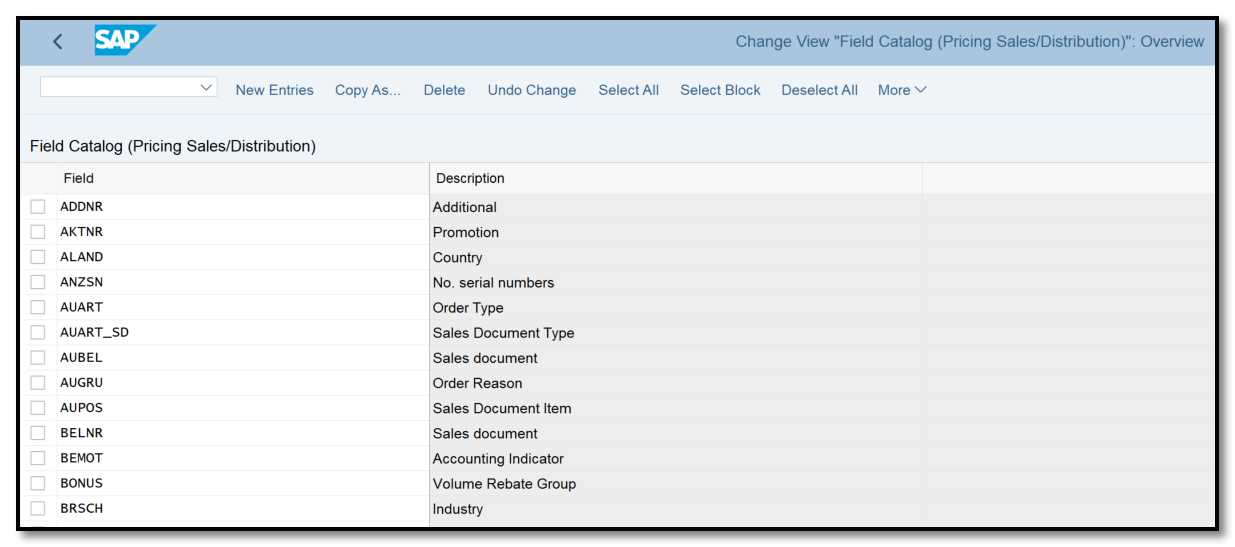
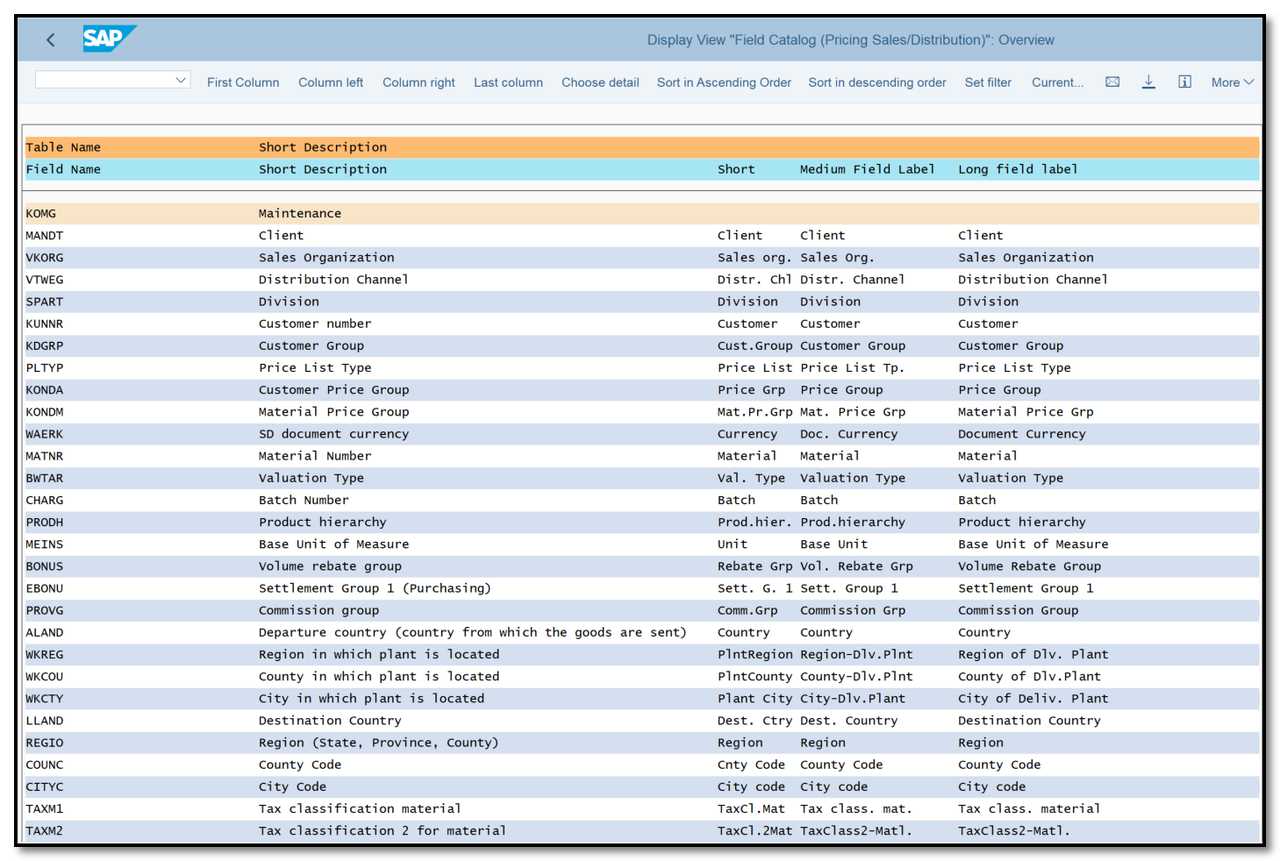
You can check the fields included in the standard field catalog using this transaction (Figure 2). If this list does not satisfy your needs, you can use the drop-down list to obtain a bigger list of fields in the catalog (function key F4). The longer list is shown in Figure 3.
Figure 2 Field catalog
Figure 3 Field catalog, expanded
A table that combines Sales Organization and Customer Group is required. We first make sure that these fields are accessible by checking the field catalog.
Create Condition Table
Use the menu path: IMG ➢ Sales And Distribution ➢ Basic Functions ➢ Pricing ➢ Pricing Control ➢ Condition Tables and Field Catalog➢ Create Condition Tables (V/03).
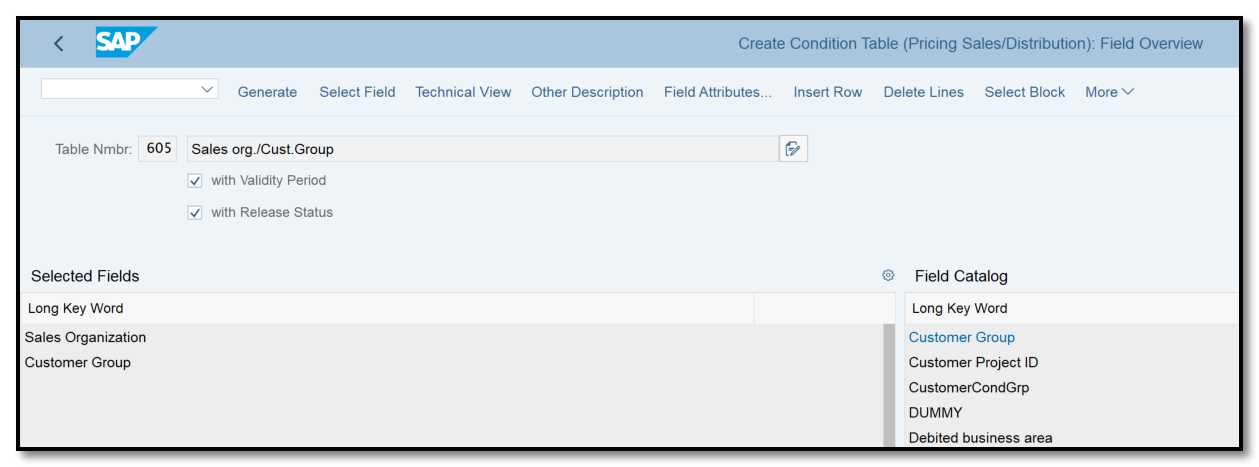
With this setting, you can create a condition table. The selected fields are displayed in the list on the left, as seen in Figure 4. The new table's key will be formed from these fields. To manage the pricing data in the table, you can additionally specify a validity period and a release status.
Figure 4 Defining a condition table
The pricing records receive a Valid From date and a Valid To date if you choose the option with a validity period. You can select the precise time period for which the record should be active when you maintain the price. The record is rendered useless once the expiration date has passed. With the help of this tool, you can keep a historical record of all prior prices over an extended period of time. Additionally, by using the Valid From date, you can create new pricing records in advance and release them.
By adding a status field to the pricing record, you can further regulate it if you choose the With Release Status option. Depending on your needs, you can use this functionality to flag a record as active or as not yet released.
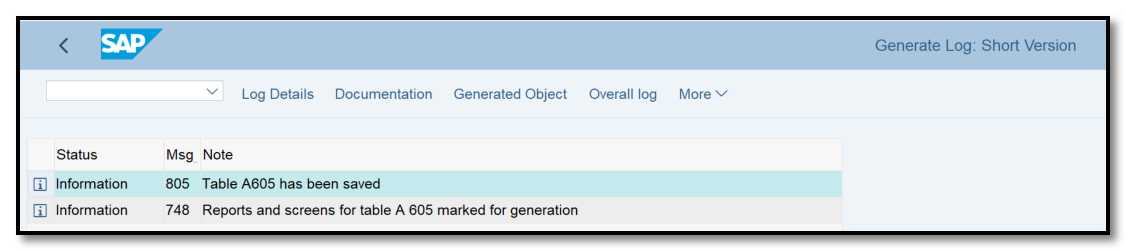
After choosing the necessary fields, save your selections and create a new condition table. The generation log screen is depicted in Figure 5.
Figure 5 Saving and generating a new condition table
Step 2: Define the Access Sequences
To provide an access sequence for determining pricing, the menu is as follows:
IMG ➢ Sales And Distribution ➢ Basic Functions ➢ Pricing ➢ Pricing Control ➢ Access Sequences ➢ Set Access Sequence. The transaction code is V/07.
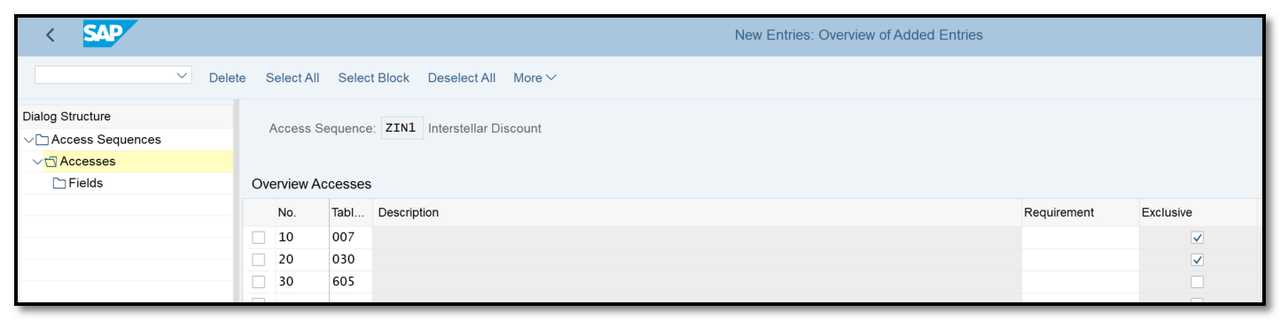
You can make a new access sequence from the Change View: Access Sequences: Overview screen by selecting the New Entry button, then adding the condition tables in the necessary sequence (Figure 6).
Figure 6 Defining an access sequence
The Exclusive indicator at the access steps is shown in Figure 6. Any further searching is stopped if the system discovers a record at any stage. Additional records at higher levels won't be taken into account; instead, the price will be determined using an exclusive record.
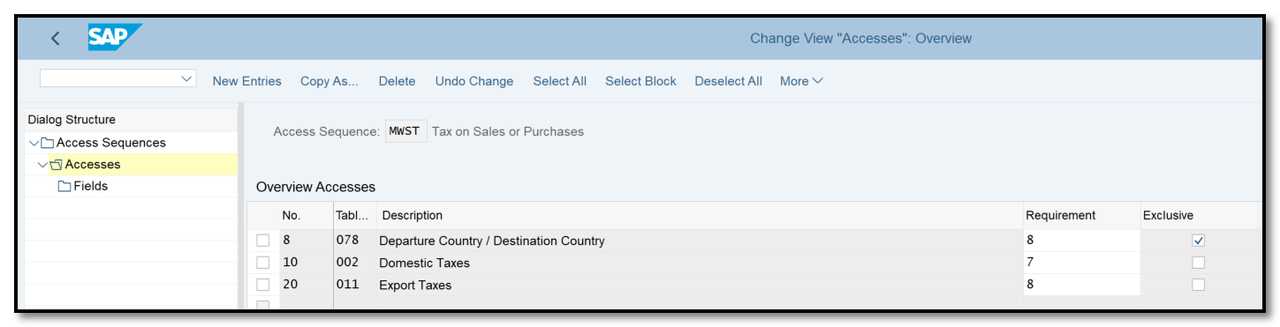
You can include a special routine in the Requirement field for the access step. You can include a precondition that must be true in order for a certain access to be granted. The common access sequence (MWST), which is utilized to determine the tax conditions, is one example (Figure 7). The access sequence searches domestic and foreign tax rate tables. In this illustration, the first stage of MWST contains required routine 8. This code determines if the address is a local or international one. If this preliminary condition is met, the system starts looking for tax records. If not, the next access (for domestic taxes) is made without performing this one. For domestic destination, requirement routine 7 is used. By checking the criteria in this manner, you can increase the access sequence's effectiveness.
Figure 7 Access sequence using requirement routine.
Step 3: Set Up the Condition Types
The fundamental pricing components employed in the pricing schema are pricing conditions.
Define Condition Types
To define condition types, use the menu path :
IMG ➢ Sales And Distribution ➢ Basic Functions ➢ Pricing ➢ Pricing Control ➢ Condition Tables and Field Catalog➢ Define Condition Types ➢ Set Condition Types for Pricing (V/06).
A list of existing condition types in the system is available on the overview screen. Use the New Entries option or a copy of a reference condition type to create a new condition type.
The condition type can have a four-character alphanumeric name specified. The crucial parameters on the Details panel are listed below, as seen in Figure 8.
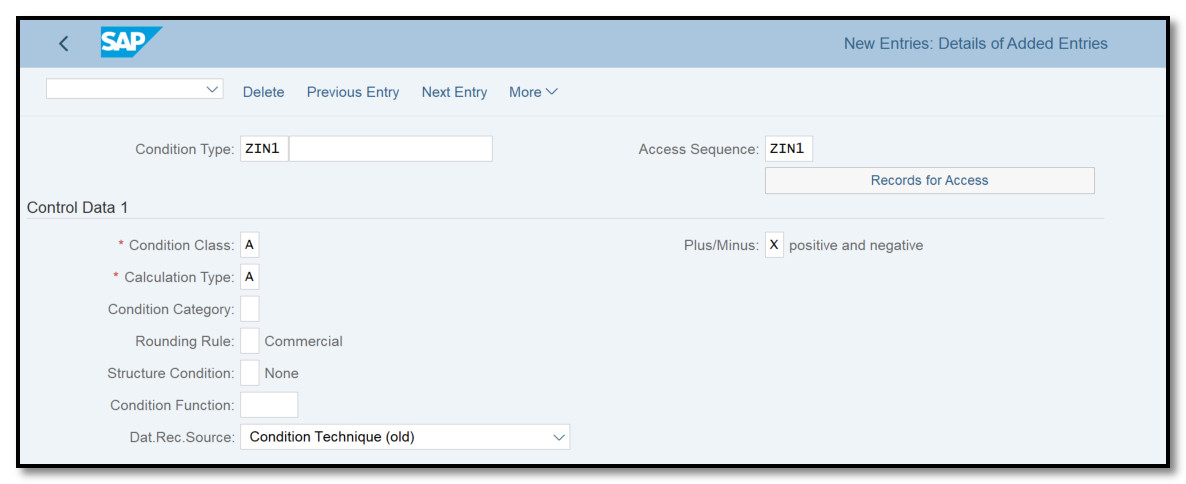
Figure 8 Defining a condition type
To get detailed information on how to setup pricing condition types, please refer to the article "Set Up the Pricing Condition Types in SD".
Define Upper/Lower Limits for Conditions
The path here is:
IMG ➢ Sales And Distribution ➢ Basic Functions ➢ Pricing ➢ Pricing Control ➢ Condition Tables and Field Catalog➢ Define Condition Types ➢ Define Upper/Lower Limits For Condition (OVB2).
You can impose restrictions on a price condition's value using this parameter (Figure 9). You can let manual adjustments to be made to the condition's value. You can manage manual modifications and minimize human mistakes by setting a value range limit. If the user provides a value that is outside of the condition's acceptable range when creating condition records or in the sales order, they will receive an error message.

Figure 9 Defining limits for conditions
Check Settings for Condition Types
Follow this path:
IMG ➢ Sales And Distribution ➢ Basic Functions ➢ Pricing ➢ Pricing Control➢ Condition Tables and Field Catalog ➢ Define Condition Types ➢ Check Settings For Condition Types (VCHECKT685A).
It is advisable to run this report for all newly specified condition types. Although it doesn't examine every area of customization, it does some important checks on things like the use of scale types for group conditions.
Step 4: Define the Pricing Procedure
A group of condition categories are arranged sequentially as part of the pricing procedure. You organize several condition types in the order that SAP should access them when you define a pricing method. After that, you adjust the following settings:
- The formula used to calculate the values in the schema
- When to read the underlying price value by accessing the condition type
- Whether a condition type during sales order processing should be statistically, manually, or both
- A pricing condition type's applicability for accrual or revenue posting to accounting
To set up a pricing procedure, use the menu path:
IMG ➢ Sales And Distribution ➢ Basic Functions ➢ Pricing ➢ Pricing Control ➢ Define And Assign Pricing Procedures ➢ Set Pricing Procedures (V/08).
Various pricing techniques are offered by SAP standard. A flexible standard procedure is RVAA01. Additionally, SAP offers a few pricing methods that are country-specific, like RVAAUS (Standard - USA w/out Jurisdiction Code) and RVAJUS (Standard - US w. Jurisdiction).
The existing pricing procedure that most closely matches your needs can be copied to construct your new pricing procedure. A pricing procedure can also be created from scratch. Moving from left to right on the screen, we'll now elaborate on the price process and customization of the elements (shown in Figure 10).
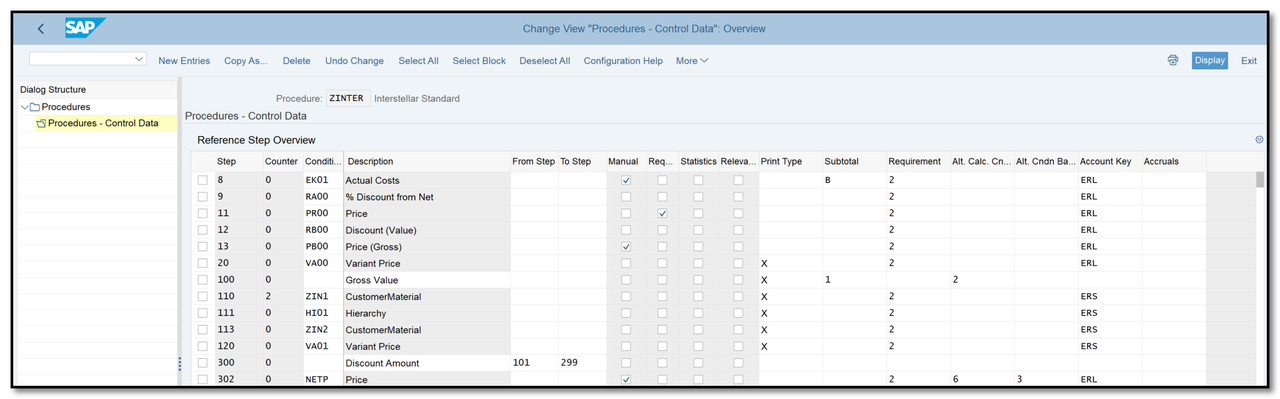
Figure 10 Setting up a pricing procedure, part 1
You must scroll down to see the additional phases in the pricing procedure, which are depicted in Figure 11, as they cannot all fit on a single screen.
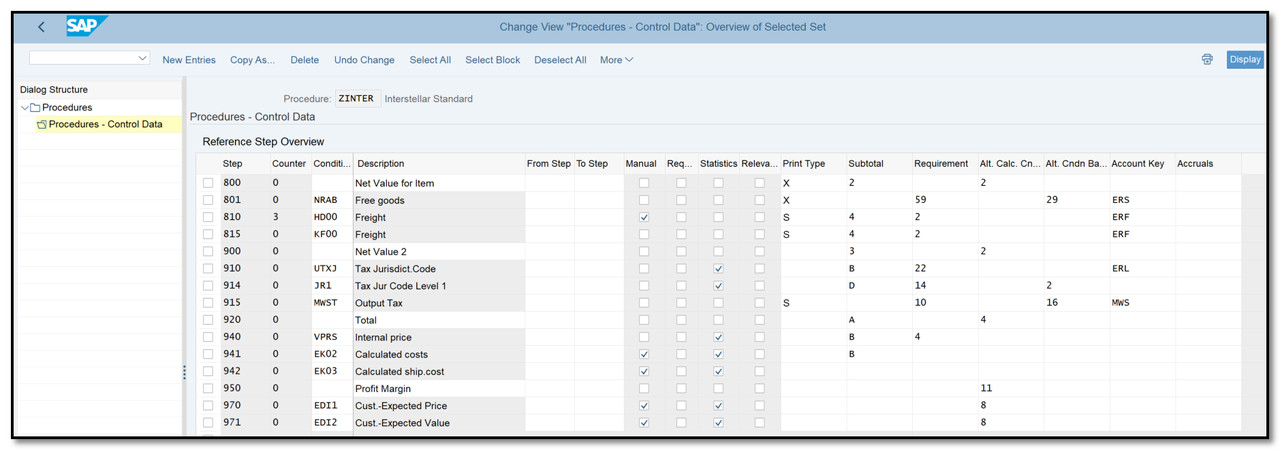
Figure 11 Setting up a pricing procedure, part 2
Step The sequence in which the condition types will be accessed throughout the pricing procedure is represented by this. The first condition type can be assigned here at step 10, the second at step 20, and so on. In case you need to modify the pricing system later, it is suggested to use a spacing of 10 between steps and then put steps between 10 and 20.
Counter This represents a substep.
Condition Type At each step, the condition type must be entered. Each condition type will be read by the system and computed in the sequence indicated by the step number.
Description The description of the condition type will automatically appear here if you have provided a condition type. You can add a detailed explanation of the step you're describing for the subtotal here (such as Gross Value).
From, To These serve as a basis for a step's calculation. For instance, you might specify From as 20 if the operation in step 30 was to be applied to the value found in line 20. Subtotals are also defined using the From and To fields.
Manual If this checkbox is checked, the condition value for the condition type is either explicitly entered by the user or is generated by a process outside of SD, such as pricing.
Required This box's selection makes the condition necessary. The user receives a warning that pricing is incomplete if SAP is unable to locate a valid record for a condition type with the Req. check box selected.
Statistical By checking this box, the condition becomes statistical. It will be calculated in the same way as any other condition, but the value will have no bearing on or impact on the sum.
Print This regulates whether a condition line is printed on printed outputs like invoices and order confirmations. You can select X to print condition lines at the item level, S to display condition lines at the total level, or you can leave this field empty to skip printing the condition lines value.
Subtotal The fields where the subtotal value is to be parked are designated using the Subtotal field. Utilize this to enter condition amounts, condition rates, and subtotal values into Subtotal fields for usage in reports or other user-defined calculations.
Requirement This element attaches a routine before computing the value of a condition type. It is comparable to a condition that must be met before moving on. The condition is not accessed if the prerequisite is unsuccessful. As an illustration, requirement 2 in steps 11 through 110 instructs SAP to only access matching condition types when the connected sales line item in the sales document is pertinent for pricing. SAP will not access PR00 for such line items if the sales-order line happens to be a free item, such as item category TANN.
Alternative Calculation TypeWhen you want to apply your own calculation formula as an alternative to the common condition technique, use this field (labeled CalType in Figure 11). As an alternative calculation type, you can develop a formula that is unique to each customer and apply it to the condition type in the pricing procedure.
Alternative Formula For Calculation Of Base Value Use this field (labeled BasType in Figure 11) to modify the step's calculation base value.
Accounting Key Use this field to apply the condition type value to a revenue account in FI (shown as AccK in Figure 11).
Accruals To post the condition type value to an accrual or provision account in FI, use the Accruals key, which is displayed as Accru.
You can see an example of this pricing process in action in Figure 12.
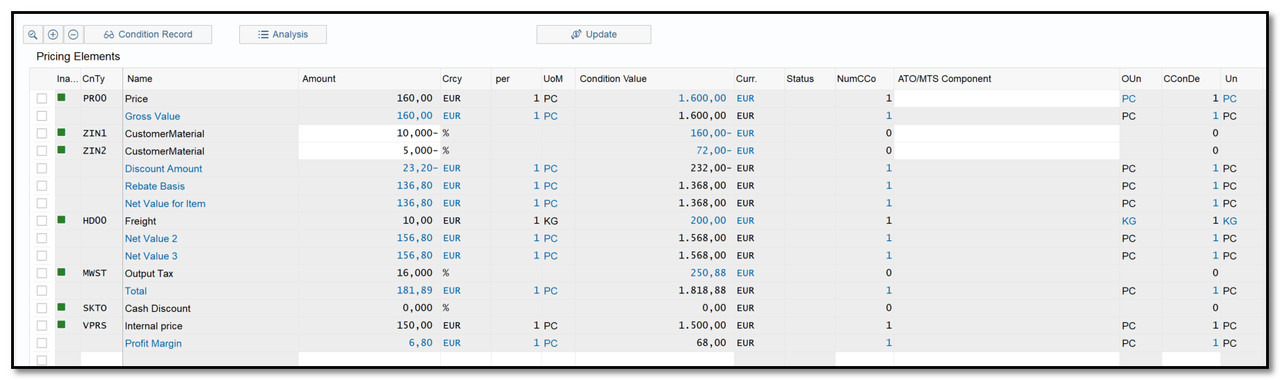
Figure 12 Pricing in a sales order
Step 5: Assign the Pricing Procedure
The determination rule that will determine which pricing procedure will be employed is defined as the final step in the pricing setup. Based on the sales area, sales document type, and client master record, the system chooses the price technique. To manage the choice, use the fields Customer Pricing Procedure and Document Pricing Procedure.
Define the Document Pricing Procedure
A one-character field called Document Pricing Procedure (DoPP) can be either alphabetical or numeric. It acts as the connection between pricing and a document. The menu path is:
IMG ➢ Sales And Distribution ➢ Basic Functions ➢ Pricing ➢ Pricing Control ➢ Define And Assign Pricing Procedures ➢ Define Document Pricing Procedure (OVKI).
You have the choice of using the default parameters (Figure 13) or making a new entry.
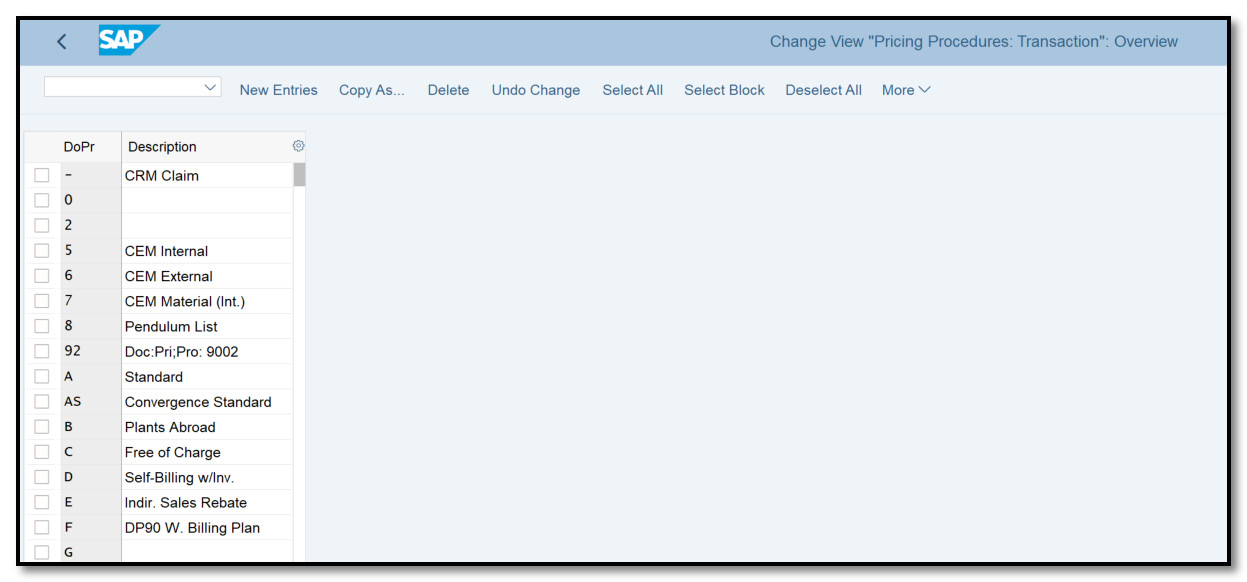
Figure 13 Defining a DoPP
Various Documents Should Be Given the Document Pricing Procedure
The DoPP must then be assigned to the various types of sales and billing documents. This enables you to assign several sales documents with various pricing techniques. For instance, a normal sales order for the same customer can follow a different price approach than an inquiry or a quotation. The menu path is:
IMG ➢ Sales And Distribution ➢ Basic Functions ➢ Pricing ➢ Pricing Control ➢ Define And Assign Pricing Procedures ➢ Assign Document Pricing Procedure To Sales Document Types (OVKJ).
The assignment screen can be seen in Figure 14.
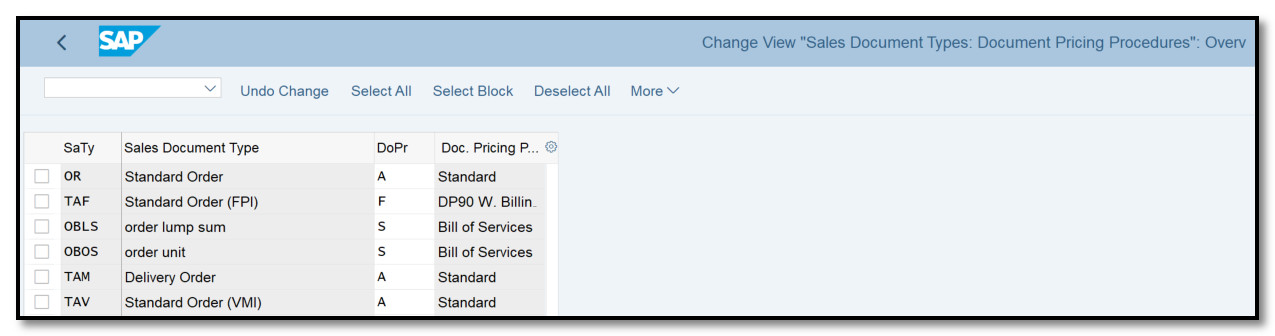
Figure 14 Assigning a DoPP
Use the menu path:
IMG ➢ Sales And Distribution ➢ Basic Functions ➢ Pricing ➢ Pricing Control ➢ Define And Assign Pricing Procedures ➢ Assign Document Pricing Procedure To Billing Document Types (OVTP) to add a pricing procedure to billing documents.
Define the Customer Pricing Procedure
Which pricing method should be chosen for a client is specified in the Customer Pricing Procedure (CuPP) field. It has a single character and an alphabetical or numeric description. You can create a CuPP via transaction code OVKP or using the menu path
IMG ➢ Sales And Distribution ➢ Basic Functions ➢ Pricing ➢ Pricing Control ➢ Define And Assign Pricing Procedures ➢ Define Customer Pricing Procedure.
The client pricing procedure screen is depicted in Figure 15. After defining the customer pricing procedure, you give the corresponding customer master records this CuPP value. This field can be seen in the customer master's Sales view.
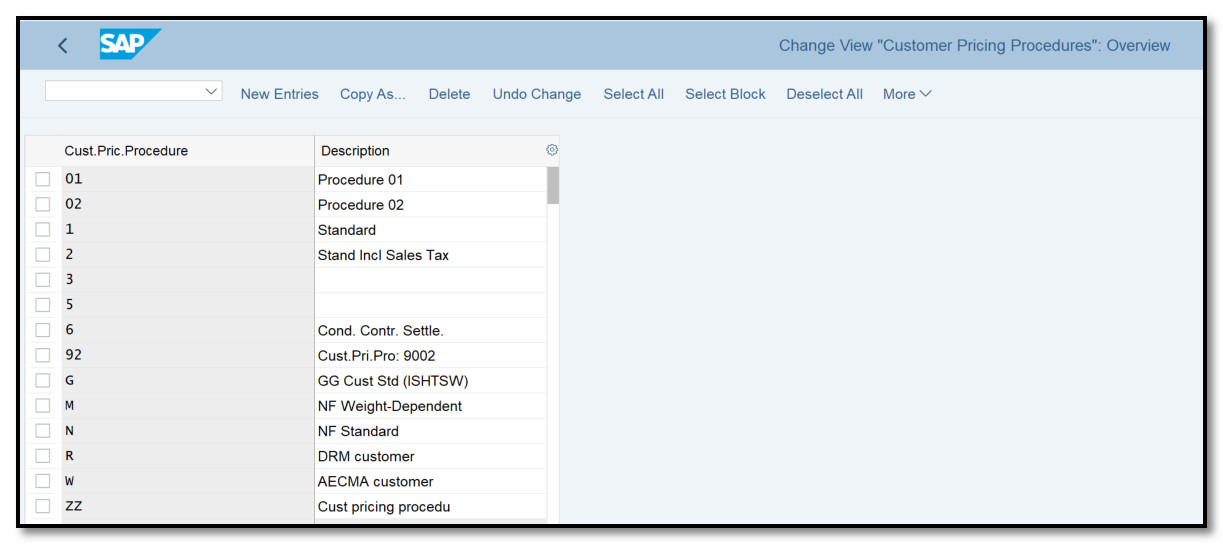
Figure 15 Defining the CuPP
Define the Pricing Procedure Determination
The final step is to connect all the points and specify the determination. You can do this vis transaction code OVKK, or using the menu path
IMG ➢ Sales And Distribution ➢ Basic Functions ➢ Pricing ➢ Pricing Control ➢ Define And Assign Pricing Procedures ➢ Define Pricing Procedure Determination.
You can configure a pricing procedure to be a combination of a sales area, a customer pricing procedure, and a document pricing procedure, as illustrated in Figure 16.

Figure 16 Pricing procedure determination